
This is the next post of our blog series where we introduce the capabilities of the Matomo (Piwik) platform (our previous post was How to create a scheduled task in Matomo). This time you’ll learn how to create a new widget. For this tutorial you will need to have basic knowledge of PHP.
What is a widget in Matomo?
Widgets can be added to your dashboards or exported via a URL to embed it on any page. Most widgets in Matomo represent a report but a widget can display anything. For instance a RSS feed of your corporate news. If you prefer to have most of your business relevant data in one dashboard why not display the number of offline sales, the latest stock price, or other key metrics together with your analytics data?
Getting started
In this series of posts, we assume that you have already set up your development environment. If not, visit the Matomo Developer Zone where you’ll find the tutorial Setting up Matomo.
To summarize the things you have to do to get setup:
- Install Matomo (for instance via git).
- Activate the developer mode:
./console development:enable --full. - Generate a plugin:
./console generate:plugin --name="MyWidgetPlugin". There should now be a folderplugins/MyWidgetPlugin. - And activate the created plugin under Settings => Plugins.
Let’s start creating a widget
We start by using the Matomo Console to create a widget template:
./console generate:widgetThe command will ask you to enter the name of the plugin the widget should belong to. I will simply use the above chosen plugin name “MyWidgetPlugin”. It will ask you for a widget category as well. You can select any existing category, for instance “Visitors”, “Live!” or “Actions”, or you can define a new category, for instance your company name. There should now be a file plugins/MyWidgetPlugin/Widgets.php which contains already some examples to get you started easily:
class Widgets extends \Piwik\Plugin\Widgets
{
    /**
     * Here you can define the category the widget belongs to. You can reuse any existing widget category or define your own category.
     * @var string
     */
    protected $category = 'ExampleCompany';

    /**
     * Here you can add one or multiple widgets. You can add a widget by calling the method "addWidget()" and pass the name of the widget as well as a method name that should be called to render the widget. The method can be defined either directly here in this widget class or in the controller in case you want to reuse the same action for instance in the menu etc.
     */
    protected function init()
    {
        $this->addWidget('Example Widget Name', $method = 'myExampleWidget');
        $this->addWidget('Example Widget 2',    $method = 'myExampleWidget', $params = array('myparam' => 'myvalue'));
    }

    /**
     * This method renders a widget as defined in "init()". It's on you how to generate the content of the widget. As long as you return a string everything is fine. You can use for instance a "Piwik\View" to render a twig template. In such a case don't forget to create a twig template (eg. myViewTemplate.twig) in the "templates" directory of your plugin.
     *
     * @return string
     */
    public function myExampleWidget()
    {
        $view = new View('@MyWidgetPlugin/myViewTemplate');
        return $view->render();
    }
}
As you might have noticed in the generated template we put emphasis on adding comments to explain you directly how to continue and where to get more information. Ideally this saves you some time and you don’t even have to search for more information on our developer pages. The category is defined in the property $category and can be changed at any time. Starting from Matomo 2.6.0 the generator will directly create a translation key if necessary to make it easy to translate the category into any language. Translations will be a topic in one of our future posts until then you can explore this feature on our Internationalization guide.
A simple example
We can define one or multiple widgets in the init method by calling addWidget($widgetName, $methodName). To do so we define the name of a widget which will be seen by your users as well as the name of the method that shall render the widget.
protected $category = 'Example Company';
public function init()
{
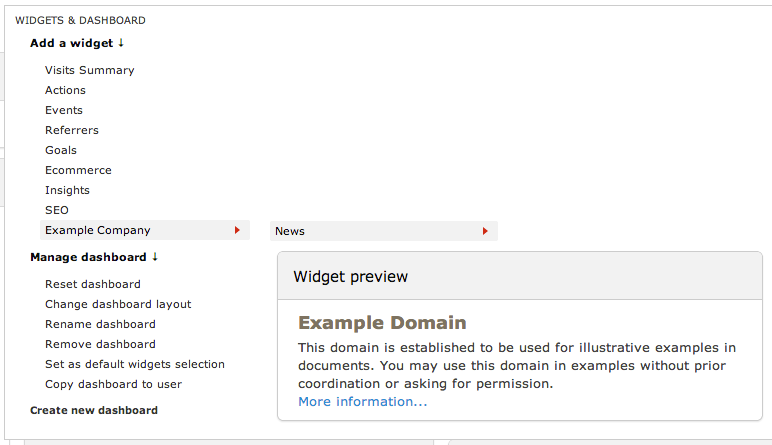
// Registers a widget named 'News' under the category 'Example Company'.
// The method 'myCorporateNews' will be used to render the widget.
$this->addWidget('News', $method = 'myCorporateNews');
}
public function myCorporateNews()
{
return file_get_contents('http://example.com/news');
}This example would display the content of the specified URL within the widget as defined in the method myCorporateNews. It’s on you how to generate the content of the widget. Any string returned by this method will be displayed within the widget. You can use for example a View to render a Twig template. For simplification we are fetching the content from another site. A more complex version would cache this content for faster performance. Caching and views will be covered in one of our future posts as well.
Did you know? To make your life as a developer as stress-free as possible the platform checks whether the registered method actually exists and whether the method is public. If not, Matomo will display a notification in the UI and advice you with the next step.
Checking permissions
Often you do not want to have the content of a widget visible to everyone. You can check for permissions by using one of our many convenient methods which all start with \Piwik\Piwik::checkUser*. Just to introduce some of them:
// Make sure the current user has super user access
\Piwik\Piwik::checkUserHasSuperUserAccess();

// Make sure the current user is logged in and not anonymous
\Piwik\Piwik::checkUserIsNotAnonymous();
And here is an example how you can use it within your widget:
public function myCorporateNews()
{
    // Make sure there is an idSite URL parameter
    $idSite = Common::getRequestVar('idSite', null, 'int');

    // Make sure the user has at least view access for the specified site. This is useful if you want to display data that is related to the specified site.
    Matomo::checkUserHasViewAccess($idSite);

    $siteUrl = \Piwik\Site::getMainUrlFor($idSite);

    return file_get_contents($siteUrl . '/news');
}
In case any condition is not met an exception will be thrown and an error message will be presented to the user explaining that he does not have enough permissions. You’ll find the documentation for those methods in the Matomo class reference.
How to test a widget
After you have created your widgets you are surely wondering how to test it. First, you should write a unit or integration test which we will cover in one of our future blog posts. Just one hint: You can use the command ./console generate:test to create a test. To manually test a widget you can add a widget to a dashboard or export it.
Publishing your Plugin on the Marketplace
In case you want to share your widgets with other Matomo users you can do this by pushing your plugin to a public GitHub repository and creating a tag. Easy as that. Read more about how to distribute a plugin.
Advanced features
Isn’t it easy to create a widget? We never even created a file! Of course, based on our API design principle “The complexity of our API should never exceed the complexity of your use case.” you can accomplish more if you want: You can clarify parameters that will be passed to your widget, you can create a method in the Controller instead of the Widget class to make the same method also reusable for adding it to the menu, you can assign different categories to different widgets, you can remove any widgets that were added by the Matomo core or other plugins and more.
Would you like to know more about widgets? Go to our Widgets class reference in the Matomo Developer Zone.
If you have any feedback regarding our APIs or our guides in the Developer Zone feel free to send it to us.


